Friday, February 21, 2014

Foodie Friday

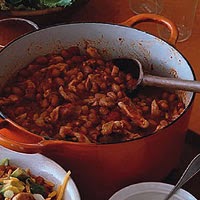
Rachel Ray's Fiery Chicken Chili

I shared this a few years ago, but it is worth the repeat.  
I had never heard of 'chipotle in adobo' before I came across this recipe, 
now I make sure it's always in the pantry.

ingredients:
  • 2 tablespoons extra-virgin olive oil
  • 2 onions, chopped
  • 4 cloves garlic, thinly sliced
  • 4 teaspoons dried oregano
  • 2 1/2 teaspoons ground cumin
  • 1 1/2 teaspoons salt
  • 1 teaspoon paprika
  • 1 large chipotle chile in adobo sauce, finely chopped, sauce reserved
  • 3 pounds skinless, boneless chicken thighs, thinly sliced
  • 2 28 ounce cans diced tomatoes with their juice
  • 3 15 1/2 ounce cans  pinto beans, rinsed
  • Chopped avocados, cilantro leaves, grated cheddar cheese, chopped scallions and sour cream, for serving
****I use 1 can petite diced and one can crushed tomatoes, and black beans (no pinto)

directions:
  1. In a large, heavy saucepan, heat the olive oil over medium heat. Add the onions, garlic, oregano, cumin, salt and paprika and cook, stirring occasionally, until the onion is softened and the spices are fragrant, about 7 minutes. Stir in the chipotle and 1 tablespoon adobo sauce. Add the chicken and cook, stirring, until the meat begins to turn opaque, about 2 minutes. Stir in the tomatoes and beans and bring to a boil. Lower the heat, cover and simmer for 10 minutes. Uncover, increase the heat and simmer the chili briskly, stirring often, until thickened, 25 to 30 minutes.
  2. Add more adobo sauce to taste, serve with avocados, cilantro, cheese, scallions and sour cream - I know this will become one of your favorites too!

I recently picked up several stems of pussy-willow at Whole Foods - they and Trader Joe's have the bestest flowers! These are sweet arrangements, I know you can do it!


Contact Moore Designs to help you create a beautiful home.
E-design services available. 


Tuesday, February 18, 2014

Fun with my Grand!

I am in southern Washington state taking care of my grand while his parents went away for the weekend.  We have had some fun adventures and also did a little craft project to give his parents, did one for me too!
                                   

Great idea from Pinterest.  Using art board, decide what color to use as background, paint and let dry. Next put 'blobs' of paint on a plate and do one foot at a time, as you can see the feet are placed with outside edges together. I let dry overnight, then with a sharpie drew the body and antennae. So simple - other than trying to hold a toddler (16 months) and keeping the paint from getting everywhere! 

                                                                               ❤️

Moore Designs would be privileged to help you turn your house into a lovely home.
E-design services available.


Saturday, February 8, 2014

Foodie Friday

Paleo Chocolate Chip Cookies


These cookies are very yummy with no wheat or dairy. 
A little nibble satisfies even the most voracious sweet tooth.


I found this great recipe here.

Ingredients
  • 1 c. almond meal
  • scant ¼ t. sea salt
  • ⅛ t. baking soda
  • ¼ t. cinnamon, optional, but delicious!
  • 3 T. coconut oil or butter, melted
  • 2 T. honey or maple syrup
  • 1½ t. vanilla
  • ½-1 t. water, only if/as needed
  • 2-4 T. chopped dark chocolate, depending on your personal preference (I used 3 T)
Instructions
  1. Preheat the oven to 350 degrees.
  2. Mix the almond meal, salt, baking soda, and cinnamon.
  3. Stir in the coconut oil, honey/maple syrup, and vanilla.
  4. Add in water as needed to bring everything together.
  5. Stir in the chopped chocolate last.
  6. Bake for 10-11 minutes on a well oiled or parchment paper-lined cookie sheet (the edges should be golden).
  7. Let them sit on the pan for 5-10 minutes (they firm up during this time, so this is an important step!).
  8. Remove and enjoy!
***I doubled the recipe and use 90% Cocoa bars

I hit Trader Joe's today and am deeply sorry for those of you who don't have one nearby.  The almond flour is less than half the price of Whole Foods or my local grocery store.  AND, they have the BEST flowers. It is tulip season and they have an awesome variety of colors. Tulips are my fave along with hydrangeas and sunflowers.

You KNOW the drill, go outside and cut what is in your yard or treat yourself from the grocer or flower market.


Moore Designs would welcome the opportunity to help you turn your house into a lovely home.  E-design services available.


Share/Save/Bookmark

Monday, February 3, 2014

Project Monday

Painted Furniture

A few weeks ago at the Atlanta Market I was fortunate to meet with 
Amy Howard - a beautiful furniture maker - who has a line of paint and finishes she markets as 'Amy Howard at Home'.  Go here to see my post last year about her and all of the finishes.
At market I was thrilled to take part in a hands-on demo which was great fun.

 It's taken me a year to finally get the courage to paint my grandmother's hutch, which is a solid piece of furniture in mahogany.  The s-curved glass with the leaded window pane is not something that can be found these days.  While beautiful in its day, it just isn't 'me'.

I thought I would 'practice' on a tea cart - that was grandma's too - to see how brave I am.
It all comes apart which helps for those hard to reach places. 
I'm using the 'One-Step' paint process which is a chalk paint that can be painted over any surface, no sanding or prep required. My fave for sure. It does not need to be sealed but I like to have a bit of depth rather than a flat finish.
One coat, I did long strokes. The paint can be a bit thick, a drop of water helps.

Two coats on everything.
A touch of gold adds so much; I taped off the top edge of both trays, then painted with 'guilding size' which makes the leafing stick and waited 20 minutes for it to become 'tachy'. 
Next, lay the gold leaf over, it doesn't have to be perfect (which is my nature) as it's nice to have sort of a crackled look.
After all the leafing is finished - using a brush - get all of the flecks off. 
That stuff goes everywhere and since my kitchen is my workroom, I'll be finding 'gold' for a while!
Next is waxing, clear and then dark. Soft wax is best, I had some Annie Sloan in the clear and bought Amy's dark. This is the hard part. The clear is great because obviously it cannot be seen but when that dark goes on it isn't as smooth. Both go on with a brush and then buffed a bit, the key is to 'off-load' the wax on a piece of cardboard or something similar to get the blobs off of the edges of the brush. Even with doing that there are dark spots that I couldn't smooth out. My perfectionistic personality really has to let go a bit.  
Amy likes to use this 'dust of ages' to get into the crevices (I would say best for pieces with highs and lows in the wood) which goes on after the wax and then buff with a soft rag for a pretty sheen.
Here's the top tray - you can see the darker spots - definitely need to perfect this technique a bit more before the hutch.
All in all, it turned out pretty well - I would prefer not to have the dark spots - but honestly they aren't as noticeable in person.


Moore Designs would love to help you turn your house into a lovely home.
E-Design services available.


Share/Save/Bookmark